Feeds:
Posts
Comments

Today Bawdsey left the building, but not in a bad way. The layout had been stored for a couple of years and it’s last exhibition was Larkrail two years ago. With other projects and ‘life’ getting in the way, the layout wasn’t being used.

Fortuitously Tony Gee connected myself with an interested party, one of the layouts original operating team. Another friend had expressed an interest in the layout, but kindly stepped back (thanks Pete), when the original team said they’d definitely take it on.

So yesterday I assembled the layout for the last time, cleaned the track and plugged it in. No problems, it worked as advertised, a testament to the techniques and skills of Chris Matthewman, the original builder.

Today it had its last photoshoot in my custody for one of the magazines, and a few minutes ago I waved it goodbye with its new owners. Initially it’ll be a home layout but the possibility of doing some exhibitions with its new, or rather original team is quite likely. Most importantly though, it’s gone to a good home which was critical to passing it on.

This is likely the final post for this blog, thanks for tagging along over the years.

Paulmp ‘Bawdsey’

Larkrail 2016

This weekend is one of Bawdsey’s rare outings. Larkrail in Bath is a nice one day show, and always has interesting layouts and demo’s, including this year Pete Kirmomds Laramie https://laramieengineterminal.com

I’ll be there with Bawdsey in green diesel mode!


Hornby 08 R3261 R3342 R3343 R3484 R3485 R2933

Hornby 08
R3261 R3342 R3343 R3484 R3485 R2933

‘Finescale’ is an odd thing, its a bit like pornography, in that I’m not sure I can define it, but I know it when I see it! One of the barriers for people who want to explore the more accurate gauges in 4mm scale is the barrier of no ready to run models in the wider gauges. Phil Sutton sulzertype2.co.uk has recently broken that barrier with the options available with his class 24, but for the moment, if you want any other locomotive it’s DIY. Hornby’s 08 is an excellent candidate for a quick gauge change using the Ultrascale CAT007/378 conversion set. With the latest batch of this excellent model hitting the shop floors, there will be modellers out there wanting to convert them to either P4 or EM. The Ultrascale conversion isn’t cheap, but you do get a drop in wheel and gearset manufactured to the highest standards, ready quartered and pretty much a drop in replacement. The real beauty of it is that its engineered so that the set up and fixing of the external cranks are all sorted for you, so whilst this isn’t one of my fifteen minute heroes, it is a conversion that can be done in an evenings work.

Hornby 08 R3261 R3342 R3343 R3484 R3485 R2933

Hornby 08
R3261 R3342 R3343 R3484 R3485 R2933

I found the easy way to kick this conversion off is by removing the connecting rods. They are of a soft and pliable white metal so do take care when handling them. They are retained with a captive crankpin screwed into the hub casting of the Hornby wheelset.

Hornby 08 R3261 R3342 R3343 R3484 R3485 R2933

Hornby 08 R3261 R3342 R3343 R3484 R3485 R2933

I don’t have a spanner or socket set for these very small nuts, however I used a set of smooth faced tweezers to remove the crankpins, again being careful not to bend or damage the coupling rods.

Hornby 08 R3261 R3342 R3343 R3484 R3485 R2933

Hornby 08 R3261 R3342 R3343 R3484 R3485 R2933

Coupling rods removed and crankpins replaced. There seems to be a market for these wheelsets so they may have a value on ebay, or alternatively keep them so if you sell on in due course you can convert the locomotive back to OO and sell both loco and the ultrascales separately.

Hornby 08 R3261 R3342 R3343 R3484 R3485 R2933

Hornby 08 R3261 R3342 R3343 R3484 R3485 R2933

Hornby 08 R3261 R3342 R3343 R3484 R3485 R2933

Hornby 08 R3261 R3342 R3343 R3484 R3485 R2933

The next two tasks are the removal of the brake gear and the keeper plate, both are easy jobs, this then gives open access to the wheelsets. Make sure you note the location of any of the plastic shims as these are also insulating pieces from the electrical pickup to the baseplate.

Hornby 08 R3261 R3342 R3343 R3484 R3485 R2933

Hornby 08 R3261 R3342 R3343 R3484 R3485 R2933

Hornby 08 R3261 R3342 R3343 R3484 R3485 R2933

Hornby 08 R3261 R3342 R3343 R3484 R3485 R2933

The Hornby wheelsets can then be removed, my chassis’ had square phosphor bronze type axle bearings, you’ll note the Ultrascale set axlebearings are turned brass. If you ever wondered what the difference was between EM/P4 and OO the gauge difference can be seen easily in the above image. There is fortuitously space between the external frames for the replacement wheels to drop in with no remedial work required.

Hornby 08 R3261 R3342 R3343 R3484 R3485 R2933

Hornby 08 R3261 R3342 R3343 R3484 R3485 R2933

The wheelsets are supplied set up and quartered, the bearings have a lip on them which needs easing into the slot on the Hornby chassis where the original sets were located. Make sure this slot is clear from debris and gently press the wheelset into place. At this point I reassemble the chassis apart from the brakegear and turn my attention to the coupling rods. Prior to fitting them, run the chassis with no rods to make sure the gears are meshed properly and the wheels turn without any significant restriction. You will need to adjust the pick ups so they bear gently but positively on the rear of the wheel tread, this will give a slight resistance to the free wheeling, but not enough to stop them or make them run unevenly.

Hornby 08 R3261 R3342 R3343 R3484 R3485 R2933

Hornby 08 R3261 R3342 R3343 R3484 R3485 R2933

The original rods can be used again as I have done, and this is the fastest conversion. The Ultrascale crankpins are slightly larger diameter than the original Hornby crankpins so the holes in the coupling rods will need opening out. I use an engineers cutting broach for this, theres a link at the bottom of the article to a supplier. This is the best tool for the job to gently open out the crankpin hole, working from both sides you can cut away tiny amounts until you have a comfortable fit. It needs to be a very close fit but still revolve around the crankpin with no resistance at all. You could also use a fine rat tailed file or try drilling it but I really, really wouldn’t suggest it. It will be far too easy to take too much metal away leaving poor running or to damage the rods irreparably. The Hornby rods don’t need any thinning either so it really is a straightforward replacement. Once the rods are on, test run the chassis to ensure there’s no binding before adding the tiniest dab of superglue on the end of the thread of the crankpin. Capillary action take this into the lead thread and helps lock the nut in place.

Hornby 08 R3261 R3342 R3343 R3484 R3485 R2933

Hornby 08 R3261 R3342 R3343 R3484 R3485 R2933

Next steps are finishing, I paint the wheels using Humbrol or Revel enamels, and fit the brake gear back in place. I run the locomotive for a while to be happy everything is bedded or ‘run in’ well before filing away the ends of the threads protruding from the crankpin nut. If you want to use the Brassmasters etched rods for this conversion, I wrote up a Bachmann 08 conversion here /trinity-08-brassmaster Apart from the soldered rod construction the conversion would be almost identical. So then, that’s an evenings work to get an EM 08. No where near as daunting as some conversions can be, and a real booster for your confidence if its the first one you’ve done. The same principal can be used for a number of their conversion kits for simple steam locomotives, such as Panniers or Jinties, so, have a go!

Hornby 08 R3261 R3342 R3343 R3484 R3485 R2933

Hornby 08 R3261 R3342 R3343 R3484 R3485 R2933

Here is one supplier of Engineering Cutting broaches, hobbyholidays.co.uk at the better exhibitions you will find either Phil with Hobby holidays, or other similar suppliers for this sort of tooling. Its worth getting good quality,when you buy too, good equipment will last a lifetime, and good suppliers like Phil above, will have a range to suit your budget. Tell him I sent ya ….

_B6O4719.CR2

Hornby J15 Review

Hornby J15 R3232

Hornby J15 R3232

This is copied across from my other blog Albion Yard, I’m left wondering what to do with the Gibson kit now!
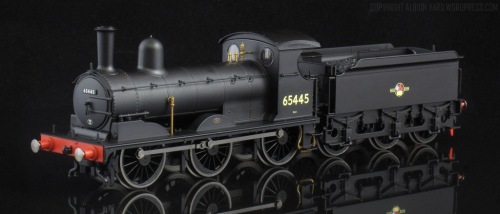
One of the latest items released by Hornby is the Great Eastern Wordsell designed Y14. The type first entered service in 1883 and was reclassified to arguable its more common designation of J15 after Grouping by the London & North Eastern Railway. The model as received depicts one of the class in their twilight years with the British Railways late crest, the subject locomotive being withdrawn in March 1963. The class was popular with both crew and enthusiasts. With a light axle loading the type was suitable for use on the light branch lines of East Anglia, for example it’s easy to locate images of the class working the Snape Maltings branch in Suffolk.

IMG_3881

The model I’ve been poking and prodding is the OO 4mm scale late BR logo J15 R3232. It is supplied in the contemporary packaging of a vacuum formed protective cover which fits inside a cardboard tray with an outer sleeve. The locomotive was well protected and no components are loose or have suffered any damage in transit.

IMG_3874

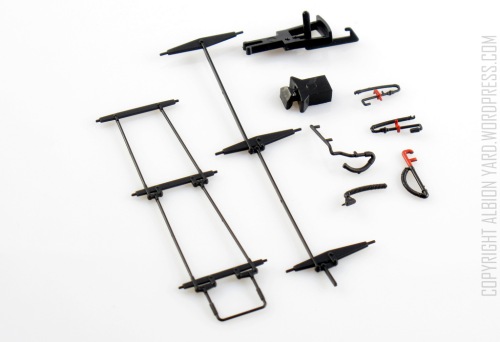
Included in the packing is a detail set including brake pull rods and the locomotive front coupling. Despite the models small size it weighs in at approximately 185g for the locomotive, the chassis block, footplate and boiler being metal castings. An additional weight is provided within the tender.

First impression often counts for me, and the J15 doesn’t disappoint. It immediately looks in proportion, edges are well defined and thin, particularly the cab roof and the color is a good opaque dull black with a very slight sheen to it. There are no paint blemishes and the detail printing is legible and clear. Like the K1 reviewed earlier on the blog, the yellow numbering looks to me a little too far towards a ‘lemon’ shade rather than a more cream color which I feel is correct. The wheel tyres and coupling rods are a pleasing steel color rather than bright chrome which blighted models in the not too recent past. Detail fittings are all correctly fitted and square and no evidence of excess glue around them. The prototype over its many years of service underwent a good number of detail changes. For the late livery as supplied it appears that Hornby have all the variations correct on this model and cross checking my available drawings the dimensions are correct too. The locomotive superstructure reflects the late chimney and dome in the forward position. Handrails reflect later era fittings with a continuous handrail above the smokebox face. Boiler mudholes are correctly offset on both sides of the engine and smokebox door is has the bevel edge and seating ring around the circumference. Smokebox dart is a separate fitting as are the lamp irons. The cab is represented with the later replacement steel plated roof and the cab sides the later smaller cut out. These are easily identified by the pronounced bowed effect of the cab profile and for the cab sides the tender rail and cab rails being of matching height.

IMG_3887

Looking at the assembly of the superstructure components the join lines all indicate that If in the future Hornby want to backdate the model to an earlier Great Eastern or LNER version that will be possible. Cab detail is delicately modelled with separate fittings, the screw reverser aligning perfectly with the external rod to the mechanism. In front of the off side cab sits a Westinghouse brake pump which is well proportioned and crisply moulded.

IMG_3870

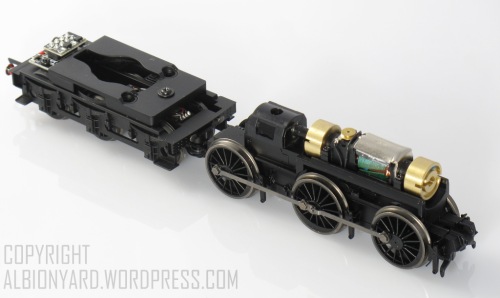
The chassis is an interesting piece of model engineering. In terms of detail, it matches the superstructure above. Below the firebox on the right hand side you can see the strengthening plate and Westinghouse pump drain. Brake shoes and pull rods are moulded in plastic and are correct shape and size. Wheels on this particular locomotive have balance weights as they should, for a ‘last forty’ batch engine, and non fluted coupling rods. Both locomotive and tender have the correct number of spokes ad profile wheels. The top of the chassis shows a representation of the inside valve gear and the underside of the boiler, allowing full daylight to be seen through the locomotive.

IMG_3850

The chassis core is a metal casting with a plastic keeper plate that has phosphor bronze wiper pickups bearing on the rear of the tyre. All were in contact and the locomotive runs very smoothly through its full speed range without hesitation. The axles sit in circular brass bearings within the chassis block. The drive is to the rear axle, this is quite a challenge with a small open cab locomotive for it to remain hidden. The motor sits in a cradle which is the underneath of the boiler, and is fitted with two brass flywheels on extended shafts either end of the motor. Drive to the rear axle is taken via a plastic drive shaft to a gearbox tower that sits within the locomotive smokebox. The tower converts the drive via gearing to a plastic final drive gear to the rear axle, with all the mechanism enclosed within the chassis block, (more on this later). There is lateral movement of all axles though not excessive and clearance on the insides of the running plate splashers too. I’ve not measured it but my feeling is that the current chassis and running plate would likely accommodate an EM/S4 conversion with little (if any) modification.

IMG_3859

All wiring is tidy and accurately soldered, another neat touch being the channel within the chassis for the wiring loom from locomotive to tender. The tender coupling has two positions to allow for normal operation and close coupling for display or gentler radius curves. I’ve had no issues on 36 inch radius curves with the close setting used.

IMG_3879

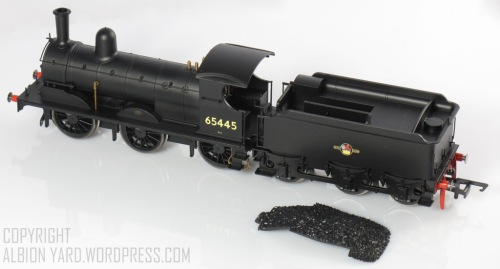
The tender is correct for prototype and era. Like the locomotives they underwent changes throughout the life of the type. In terms of detail the tender shows the same degree of finesse and accuracy to era. Tender frame cutouts are correctly oval as opposed to ‘D’ shape on earlier engines, and the brakeshoes in line with the OO whelsets. The Fire Iron shield with the holder is in place as are external curved coal rails and the water gauge, all appropriate to the era portrayed. The brake cylinders for the Westinghouse pumps have been omitted; these are unlikely to have been visible and would probably have fouled the electrical connection between engine and tender. The molded coal insert for the tender is removable and shows the peculiar rectangular spaced coal bunker underneath, no gravity assistance for the poor fireman here!

IMG_3860

The tender houses the 8 pin DCC chip blanking plate. The tender floor has slots which if fitting sound will help with the acoustics. Space is limited however and a sugar cube type speaker would seem a probable choice if fitting sound, and possibly the removal or reduction in size of the tender weight will help.

IMG_3893

Whilst looking at the chassis of the J15 I wondered how it compared to a typical Bachmann product of a similar nature. In stock I had access to a Bachmann 3F and ‘C’ class. As the ‘C was more recent I thought it’d be interesting to see them side by side. As far as the prototype goes they were similar designs of similar sizes for similar work. Clearly this is not a true like for like, but interesting in looking at how the models differed.

IMG_3883

Paint finish is excellent on both as are the lettering and logos. Hornby has a matt finish and the Bachmann, satin. In terms of detail the Hornby model has the edge in terms of finesse, in general lamp irons and small details are finer from Hornby.

IMG_3873

The J15 tender chassis has brakes in line with the wheels where the ‘C’ class are integral with the outer frame. This doesn’t sound much but when seeing the two side by side there is a noticeable difference, but nothing a bit of old fashioned modelling can’t sort out for Bachmann’s ‘C’.

IMG_3865

The loco chassis is the most interesting though. Bachmann choosing a centre axle drive and an enclosed motor, the model runs well and with this prototype Bachmann haven’t encroached into the space underneath the boiler. With the J15 and the smaller firebox Hornby could also have taken this ‘easy’ route, but have come up with an excellent design keeping the motor and mechanism hidden. The running properties are slightly smoother than Bachmanns, no doubt aided by the double flywheel. Both models have similar connections between engine and tender, but no close couple option from Bachmann. The tidy wiring from Hornby also being of note in this context too. The Hornby configuration has a good number of possibilities for small prototypes, length reduction can be achieved with one flywheel removed and a shorter cardan shaft to the gearbox.

IMG_3912

For interest I placed a 14XX next to the J15 chassis. The current motor, gearbox and flywheel configuration would all work in a 14xx chassis with no cab encroachment. With quality cast superstructure like the J15 and a metal chassis with the metal boiler motor cradle, the possibilities for future development of detailed and well running smaller locomotive prototypes is intriguing indeed.

IMG_3888

Overall then, a very competent and pleasing representation of the J15, to a high standard of finish and detail. Being the follow on release after the K1 the J15 keeps the same standards and possibly with the chassis and motor engineering, exceeds them. If these standards for toy train sets are kept this high we’ll be thoroughly spoilt. And frankly, why not?

Hornby R3232 J15 DCC Ready
Product ref LOT01-P91569
R3232-03-078

_B6O4719.CR2

Breaking News

IMG_9496


This week we shall have visitors, some image tomfoolery awaits!

Y1for the Branch

IMG_1858

At Model Rail Live this year I was particularly taken by the Y1, so much so that I bought one! It’ll need converting to EM which looks quite straightforward, it’s a pretty simple assembly, and then straight into operating stock, a nice easy win! Heljans Class 16 is very tempting too, so far I’ve resisted. Double click the images for a really good look at the Y1.

IMG_1860

IMG_1861

IMG_1862

As far as the layout goes I’ve had a couple of offers for exhibitions for 2014, which if I can get the weekends, I’ll be doing. There’ll only be a few, and I’m hoping to give the ‘presentation’ of the layout a rework to. Once Albion Yard has had its swan song at Warley in a few weeks and the layout for the DVD I’m working on is complete then I’ll be able to attend to a simple, and clean makeover. Bawdsey will appear in the DVD too, there are some very clever design features to it, which aren’t apparent when the layout is set up, but are huge benefits for the storage and transport. More on those in the DVD and on here in due course.

_B6O4719.CR2

A week or so ago I announced that we’d be taking Bawdsey to Model Rail Live 2013 at Newark. Unfortunately due to unforeseen circumstances I’ve had to postpone its appearance this year. Ben at Model Rail has kindly agreed to extend the invitation to the Model Rail Live show in 2014. We will however be taking Albion Yard to Model Rail Live this year.

Taking Stock

IMG_1136

This is the first of three grain wagons for Bawdsey. Built from the Parkside kit, it’s not the easiest of builds. Being one of the earlier kits in the range it is showing its age, but with a bit of work scrubs up well. I’ve yet to add a few more details such as the handrails and refine the end steps.

This is an example of the kit completed to P4 standards on Longcarse West and shows just how well it can turn out. I’m hoping my three will end up a similar quality.

This picture was taken at Scalefour North, one of the shows where the layout was exhibited. You can read more on Longcarse West here
 

http://waveydaveysmodellingblog.wordpress.com/

30th May 2013 Model rail Live 21st 22nd September 2013

IMG_9438

Its been a while since there’s been an update on here. I’m pleased to announce we’ve been asked to take Bawdsey to Model Rail Live September 2014 at Newark http://www.modelraillive.co.uk/IMG_9459

The layout is still in its original configuration, however I may change some of the presentation of the layout, raising its height and adding a new backscene. The lighting rig is also showing its age so if the height and backscene are altered it will make sense to swap the lights to a lighter more user friendly set up. Chris Nevard’s latest layout at Railex, Pollbrook Guerney showing just how well good lighting works.
http://nevardmedia.blogspot.co.uk/2013/05/railex.html
http://www.railex.org.uk/

IMG_9449

In terms of the rolling stock, I prefer three link couplings, however the layout has the facility to use electromagnetic couplings too, and I’ve invested in a few packs of Dingham autocouplers and may try those on some of the stock for hands free operation. New to the roster will be the Railbus seen above, and I may have a couple of steam prototypes if I’m quick enough!
Thank you for reading and we look forward to seeing you at Newark!

http://www.dingham.co.uk/

Come Fly With Me! ..

You know those days when everything seems to have gone well, and you sit back thinking, ‘the boy done good’, well heres one of those bring you down to earth moments. Looking through the images taken a day or so ago, I found this little gem. Fortunately I’d taken several very similar shots so I don’t have to unpack the trainset again.

I took the opportunity to see how the Hornby Gresley Suburbans looked on the layout too, apart from being a bit too clean, they capture the look and atmosphere of the Suffolk branch line well. When the Thompsons arrive I’ll weather them all together in a batch, to get a uniform finish in terms of overall color and texture. Then I work on the details. More to follow soon.